Setup on Demand Tailscale Exit Node Using Terraform and DigitalOcean
Over the past two years since I began using Tailscale, it has become an invaluable tool. Tailscale has enabled me to achieve many tasks that previously required complex setups. One of the most significant achievements was being able to SSH into my home development machine directly from my phone 😄.
By connecting my phone to Tailscale and using JuiceSSH, an Android app for SSH access, I could SSH into my home machine, deploy applications, and run maintenance scripts—all from my phone. Peaceful trips away from my desk.
Remote Development Made Simple
Tailscale has also made remote development seamless. By installing Tailscale on a laptop, I was able to use VS Code’s Remote Development feature to access my home development machine via SSH. This setup allowed me to work from any laptop without the need to install databases or development tools locally. Even a basic Chromebook or an ultra-light laptop turned into a powerful development workstation, as all the actual computing happened on my home machine over SSH.
I even took it a step further by installing code-server on my dev machine. This allowed me to access a full-fledged development environment from my samsung tablet via Tailscale.
What is Tailscale?
For those unfamiliar, Tailscale is a VPN software based on WireGuard. It allows you to create a secure network between your devices effortlessly. All you need to do is install Tailscale on your device, start the program, and your device joins the network—no advanced configuration required. It’s an easy-to-use, straightforward VPN solution.
By connecting my devices and home lab to this VPN, I gained the ability to access my computers remotely from anywhere.
Using an Exit Node for Secure Browsing
Tailscale allows you to set up one of your devices as an exit node. This means that when you’re using another device, you can route all your internet traffic through the exit node. For example, when I’m traveling, I set up my home computer as an exit node, ensuring that my internet traffic behaves as if I’m accessing it from home. This not only secures my browsing but also obscures my activities from public networks like those at hotels, cafes, or Airbnbs, as all they see is traffic going to Tailscale’s network, fully encrypted.
Note: Tailscale attempts to establish direct connections between devices. When that’s not possible, it uses relay servers.
On-Demand Exit Node Setup
While I don’t use the exit node frequently, it’s invaluable when I travel. Recently, I needed a US IP to access a client application, which I easily set up by deploying Tailscale on a VPS. This is a more cost-effective solution than commercial VPNs for such specific needs. A DigitalOcean server costs about $4/month, but since I only need it on-demand, I can destroy it when not in use, avoiding unnecessary costs.
This led me to write a Terraform configuration for creating a DigitalOcean server with Tailscale installed as an exit node. The setup takes around 4 minutes to be ready, and I can destroy the server when I’m done to save costs. I can also switch locations easily using Terraform or change cloud providers if needed.
Step-by-Step Guide
This article provides a step-by-step guide to setting up an on-demand Tailscale exit node. It assumes familiarity with Tailscale, Linux, and Git.
-
Install Terraform: Follow the installation instructions from HashiCorp.
-
Clone the Repository:
1git clone [email protected]:coderhs/on_demand_tailscale_exit_node.git -
Setup Terraform Configuration:
1
2
cd on_demand_tailscale_exit_node cp terraform.tfvars.example terraform.tfvarsFill in the
terraform.tfvarsfile with your values:1 2 3 4digitalocean_token = "your_digitalocean_token" tailscale_auth_key = "your_tailscale_auth_key" ssh_fingerprint = "your_ssh_fingerprint" digitalocean_location = "desired_location"For first-time DigitalOcean users, sign up here.
-
Set Up SSH Key: Upload your SSH public key to DigitalOcean. Retrieve the SSH fingerprint and the private key path. DigitalOcean’s guide provides detailed instructions.
Copy your private key to the key folder in the repo, with the name do.
1cp ~/path/to/private/key ./key/do -
Create a DigitalOcean Token: Follow the DigitalOcean API token guide and set the scope to manage droplets.
-
Tailscale Configuration: Update your Tailscale ACL settings:
-
Go to Tailscale ACLs and add the following:
1 2 3 4 5 6 7 8 9 10 11 12 13"tagOwners": { "tag:Connector": [], }, "autoApprovers": { "exitNode": ["tag:Connector"], }, // if You want the exit node to have a static IP in your network then uncomment the below line // "nodeAttrs": [ // { // "target": ["tag:Connector"], // "ipPool": ["100.81.0.1/32"], // }, // ], -
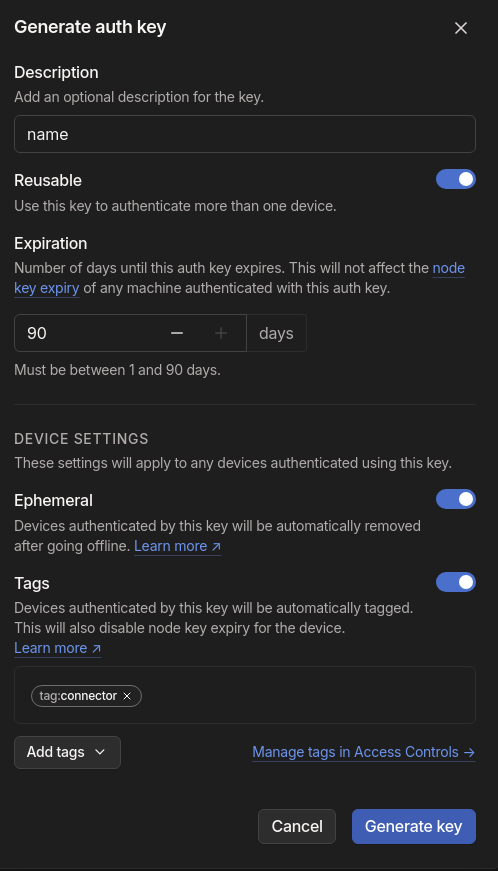
Generate an authentication key following Tailscale’s instructions. Choose ephemeral, reusable, and assign the tag Connector.
-
-
Deploy the Exit Node: Decide on the server location using DigitalOcean’s location codes. Once ready, run:
1terraform applyThe server should be available in your Tailscale network as “tailscale-exit-node” within 4-5 minutes.
-
Activate the Exit Node:
-
For Linux:
1sudo tailscale up --exit-node=tailscale-exit-node --snat-subnet-routes=false -
To disable the exit node:
1sudo tailscale up --exit-node= --snat-subnet-routes=false
-
-
Destroy the Server:
|
|
With this setup, you have a flexible, on-demand Tailscale exit node running on DigitalOcean.